NOTE: This article discusses an outdated version of Capture One. To learn more about our latest version, click here.
Introduction
Two years ago, I decided to jump ship from Lightroom to Capture One Pro. At the time, it seemed like a brave move, but after an afternoon of testing I felt somewhat confident, so jump I did. Two years on, I can confirm that this has been the best thing I could have done for my photography.
Recent changes to the Lightroom product strategy have lots of people asking for help, so when my friends at Phase One asked me to write a post outlining points to consider when migrating from Lightroom to Capture One Pro, I jumped at the chance.
Preparing to Migrate
In case anyone recalls my original post on jumping ship, I’d like to mention that Capture One Pro now supports Photoshop PSD files, so it’s no longer necessary to convert any PSD files that you might have to a different format. You can keep them in your library as they are. I also talked about cleaning up Catalogs, to avoid extra work after the migration, but this is no longer necessary either, although a bit of spring cleaning doesn’t hurt.
Export Your Lightroom Catalogs
When I was using Lightroom, I had every image I’ve shot since 2000 in a single catalog, but Capture One Pro does not work well with this many images in a single catalog, so it’s best to split images into multiple smaller catalogs.
Note that in both Lightroom and Capture One Pro, I do not keep my images inside the Catalog. I think this makes backing up hard work, and is less transparent and therefore error-prone than referencing images in a separate folder structure.
My main archive of raw images lives in a folder called Photo Originals, and at the time that I migrated, had a one catalog for 2000 to 2005 images, and then a separate year catalog for all years from 2006 to 2015.
To prepare to import these years into separate Capture One catalogs I right clicked each year folder in Lightroom and selected Export This Folder as a Catalog. I was able to select multiple folders and export them as a single catalog for years 2000 to 2005.
I have one special folder that I call Finals, and this contains a copy of every image I’ve ever shot that is worth a hoot. It’s like my Keepers folder and has images just in year subfolders. I exported this as a separate catalog as well, in preparation to migrate.
If unlike me, you already have multiple Lightroom catalogs, you will need to decide how you want to organize these in Capture One Pro, and export your various catalogs accordingly.
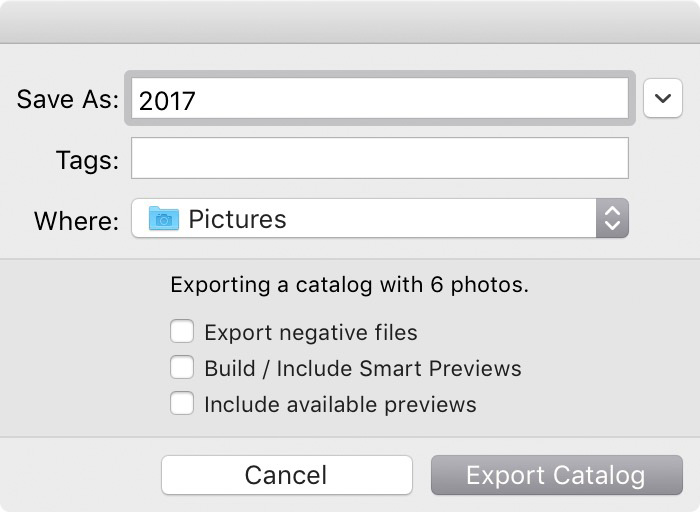
In the Export dialog in Lightroom, uncheck the three checkboxes to Export negative files, Build/include Smart Previews and Include available previews in the new Catalog. The export process is quick, and once you have your bite-sized Catalogs exported from Lightroom, you are ready to import into Capture One.
Importing Lightroom Catalogs into Capture One
To import a Lightroom Catalog, open Capture One Pro, and if you don’t already have a catalog to import to, create one from the dialoag that is displayed. I personally prefer to work with Catalogs rather than Sessions.
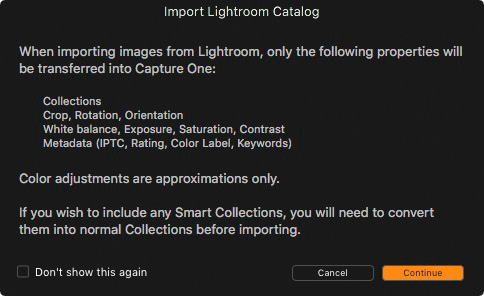
If you are creating year catalogs like me, just give your catalog a name like 2018, or whatever year you need, then from the File menu select Import Catalog > Lightroom Catalog. The following dialog (below) will tell you what settings will be imported, which includes Collections, Crop, Rotation, and Orientation information as well as White Balance, Exposure, Saturation and Contrast settings, and Metadata, including IPTC, Rating, Color Label and Keywords.
Catalog Considerations
Capture One Pro stores more information and previews inside the Catalog than Lightroom does, which I imagine is the main reason that Catalogs can’t contain that many images. I have found my strategy of keeping my original raw files for each year in single year catalogs to work very well.
My 2016 original photos catalog, the year that I jumped-ship, ended up a little over 30 GB, and my 2017 catalog was 40 GB, each containing around 22,000 images. I can’t say if Capture One Pro has got better at handling large catalogs since then, but I have grown to like having each year’s original raw images in a catalog of its own, so I’ve had no reason to try larger catalogs at this point.
My Finals catalog for my final selects for all of my shots is just over 11 GB, and only grows gradually, so this strategy has worked out well too.
Metadata Settings
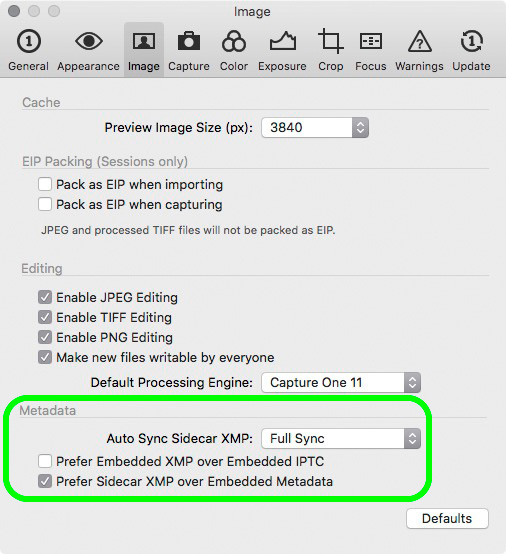
Note that in the Image tab of the Capture One Pro preferences, I have my Metadata settings set to Full Sync for the Auto Sync Sidecar XMP option. I turn off Prefer Embedded XMP over Embedded IPTC and turn on Prefer Sidecar XMP over Embedded Metadata.
These settings enable me to get the most basic metadata from sidecar files into Capture One, as well as synchronizing back to the xmp files to enable other editors to read the changes to metadata I make in Capture One. Since Capture One stores the image adjustments either inside the Catalog or in .cosetting files in Sessions, these are independent from the xmp files. If I need copies of my raw files outside of my Catalog, I right click the images in Capture One Pro and select Export > Originals, select a folder, and make sure to include the adjustments. These can easily be imported in another Catalog if needed – including the adjustments.
When using this method to copy images to my Finals Catalog for example, after making a copy I go to my Finals Catalog and right click the folder that I exported the images to, and choose Synchronize. Note though that to Synchronize adjustments you have to turn on the Show Importer checkbox, select all the images in the Import dialog, and make sure to tick ‘Include Adjustments’ within ‘Adjustments’ for this to work.
Working on Multiple Computers
I like to keep my images and catalog on an external drive so that I can move from computer to computer by just moving the drive. I was able to continue to do this with Capture One Pro, although my method is not entirely sanctioned by the Phase One Team, so try what I’m about to tell you at your own risk.
I achieve this by storing my Capture One Pro settings folder in Dropbox, with a symbolic link to the settings folder in the Library (on Mac OS). This way, all of my presets and settings automatically synchronize between my computers, so just moving my drive with my images and catalog on it from one computer to another works seamlessly. Rather than bloating this post, you can check out my post on how I do this, along with my backup strategy, etc. on my blog here.
Conclusion
From a Lightroom user’s perspective, you will notice some differences in how Capture One Pro does things, but in the two-plus years since I switched, not once have I been disappointed by my decision.
If you want an application that works the same as Lightroom, then stay with Lightroom. But, if you want the ultimate image quality, and you are willing to make a few changes to your workflow, I think it’s worth the effort to change.
If you don’t already own Capture One, you can download a 30-day trial and try it out!

Martin Bailey
Martin Bailey is a nature and wildlife photographer based in Tokyo. He’s a pioneering Podcaster and blogger, Craft & Vision author, Capture One Brand Ambassador and X-Rite Coloratti member. Fueled by his passion for nature and travel, and a tireless desire to share his knowledge and artistic vision, Martin is a popular international tour and workshop leader, helping photographers from around the world to experience and capture the wonders of this awesome planet we call home.



Hello Martin,
Your article two years ago was very useful for me in switching to C1, a decision I am very happy with.
I think there may be an error in today’s article though: you mention “most of the information about adjustments I make to images stored in the XMP sidecar files” – I think C1 does not store adjustment information in the sidecar files (unfortunately). Make some adjustments to a file and compare the xmp file before/after: no change.
If you want to keep a copy of the adjustments outside of the C1 database, the only way I know of is to export the originals with the adjustments, then discard all exported files except the .cos files in the Settings110 folder. A bit cumbersome…
Martin, thank you for your very informative articles, here and on your blog.
You mention “most of the information about adjustments I make to images stored in the XMP sidecar files”. I think that in fact C1 writes no information on the adjustments in the xmp sidecar files, only IPTC and EXIF metadata.
Hi Bernard,
As discussed over email, you are correct, but if you use the Export Original option to copy images to a new folder, the adjustments are packaged and included in the target directory, so all adjustments are preserved.
I hope that helps!
Regards,
Martin.
Thanks Martin, sorry for the redundancy, I couldn’t see my comments until today on the Phase One blog, so I took the liberty of contacting you.
A warning about data loss: you should make sure that your Lightroom catalog has exported all metadata to XMP files before you import the Lightroom catalog into Capture One.
With a Lightroom catalog open, go to Lightroom > Catalog Settings > Metadata (on a Mac), and tick the box that says “Automatically write changes to XMP”.
Then quit Lightroom. If there is still metadata to write, you will see a warning message “Adobe Lightroom is not finished writing metadata changes into XMP, do you still want to quit?”. Cancel this, and wait until you no longer see this message when you quit (I don’t know another way to have Lightroom tell you it’s done writing to XMP).
For a long time, automatically saving metadata to XMP was not enabled by default in Lightroom, so it makes sense to ensure this is checked prior to importing into Capture One.
If you don’t do this, some information won’t transfer; I suspect I lost some GPS metadata because of this setting.
Hi Martin, one of the big issues with moving over completely is the LR Camera Calibration tool. I have not yet found a way to recreate the subtle but very effective effects of the saturation sliders (especially the blue one) in C1. Would you know of anyone who could help me with this? I’m sure it can be done, but I don’t know where to start. The one other thing I don’t like is the linear keyword table, while LR has a nested one. But this seems to make LR as a DAM, haven’t seen another tool yet to deliver this functionality. How do you get around with a flat table? Am I doing something wrong that I value the nested table so much to properly categorize my pictures? At this moment I use C1 as my RAW processor and then LR as my DAM… Any help would be greatly appreciated!
Trying to Import my Lightroom Cataloque.
After the import my Lightroom Collections are all there but no Photos in them. All Photos are mixed together in a seperate Collection.
Why is this happening?
Is there any way to get your basic edits into C1 from LR if you use .dng files ? It seem LR does not write .xmp files when you have converted your raw files into dng since the xmp information is stored inside the dng.
When going to Lightroom > Catalog Settings > Metadata and writing to xmp it only updates the dng file and dont create any xmp.
I guess you are out in the cold if you want to migrate to C1 from LR using dng.
Hello,
I have my photos sorted in LR – like you – after the years they’ve been taken. When I import the catalogue into CO I get one folder containing all the photos for – lets say – 2019. No folder within that one sorted by dates/days like in LR. Why is that? If I’m looking for a specific photo from the summer I have to scroll through a lot of photos.
How can I get the same structure as in LR?
Cheers
Bjarte
Hi Bjarte,
You need to create an import preset to sort your images as they are imported. Check the section entitled “Import Folder Structure and Filename Change” here: https://mbp.ac/534
I hope that helps!
Regards,
Martin.