In this second blog post I will show you an easy and somewhat unusual trick that was taught to me by Steve Hendrix of Capture Integration in Atlanta, Georgia, USA.
A way to push a mood or grade an image
I was looking for a way to take a large section of brown grass in a housing development and shift it towards green. Steve suggested that I use the Skin Tone Editor in the Color Editor in Capture One Pro 7. Using this tool has changed how I approach color correction and how I shift colors to push a mood or grade an image.
In the fall of 2012 I shot aerials of Chicago, Illinois for a book project and my stock library. A few minutes before sunrise, we flew a Schweitzer 300 helicopter out over Lake Michigan and along the Chicago shoreline. I wanted to see if I could make a stronger photograph of the Chicago Harbor Light than the one I shot in 2003 for the Chicago book project mentioned above.
The water appeared greener than I remembered
We were flying in a “severe clear” high-pressure system. The light was clean, crisp and perfect for low-level aerial photography.
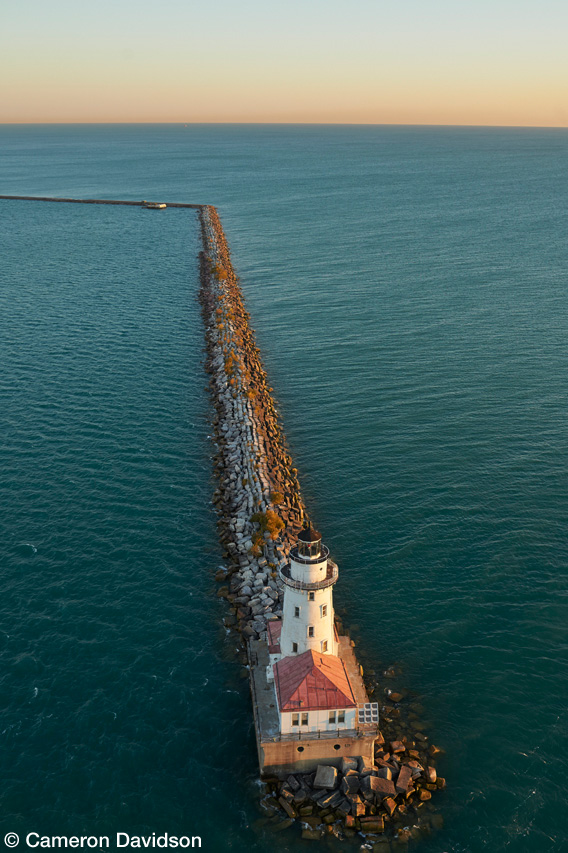
When I imported the images in the Capture One session for this shoot, I noticed the water appeared greener than I remembered. I shot this image with a Nikon D4, 35mm F/1.4 Nikkor G lens and a B+W Polarizer. The sky was close to where I wanted it but the water was a bit lacking.
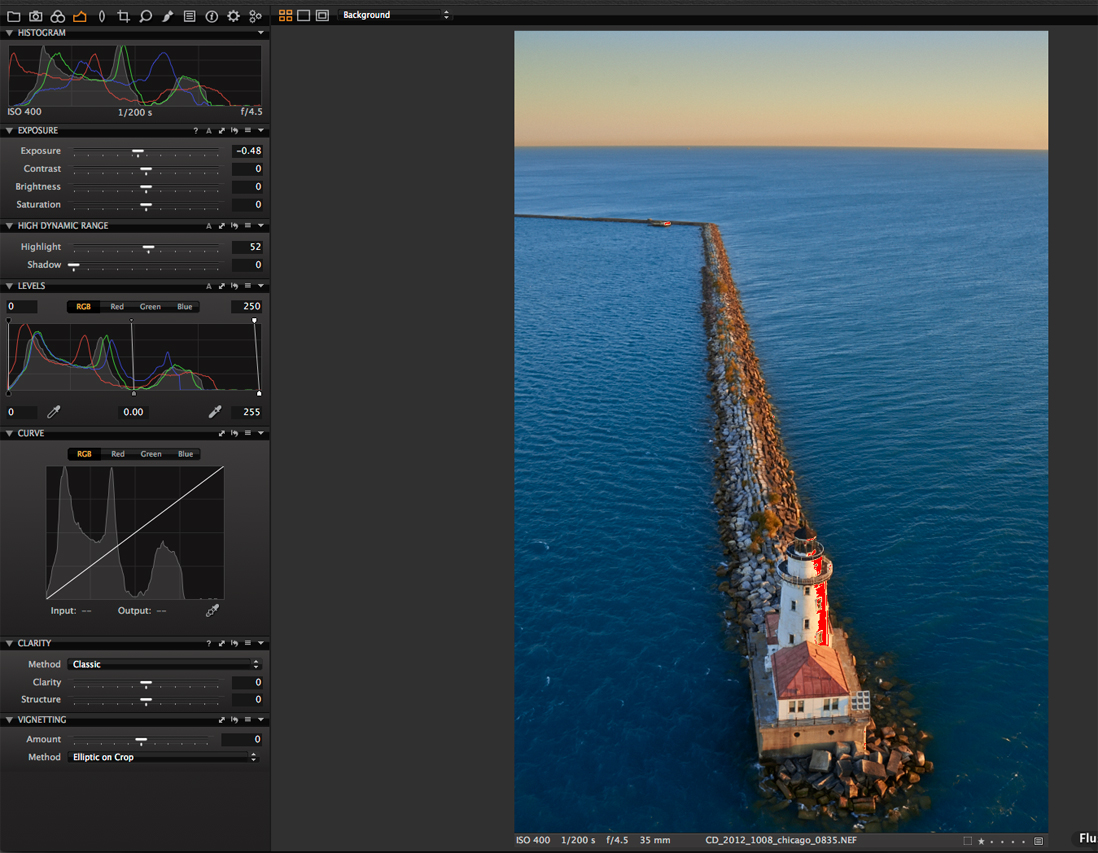
First off was an adjustment the overall exposure. I brought it down about half a stop to dampen the highlights on the sunward facing side of the ligthhouse. I used the highlight recovery tool to bring down the clipped highlights and also brought the output level down to 250.
Why I used the Skin Tone Editor
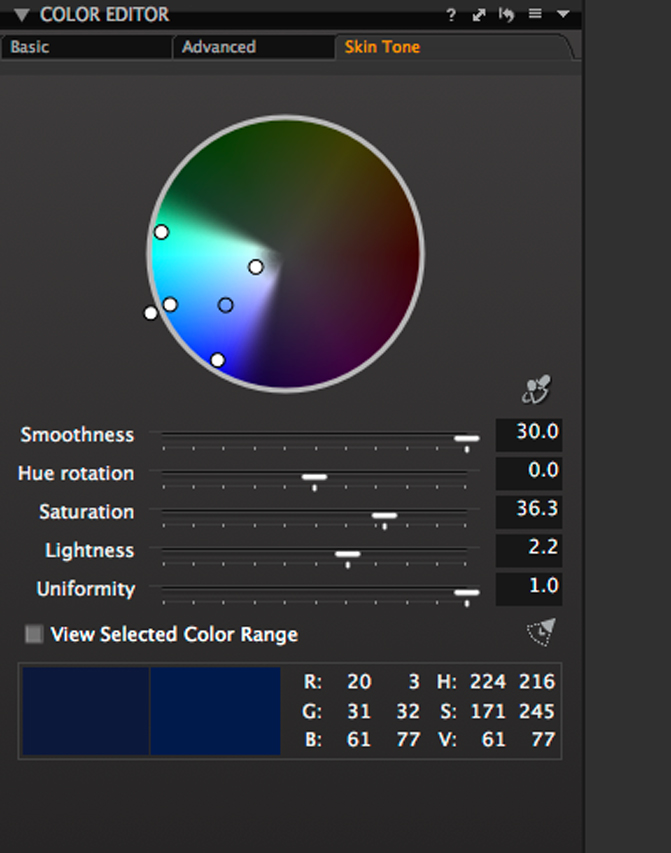
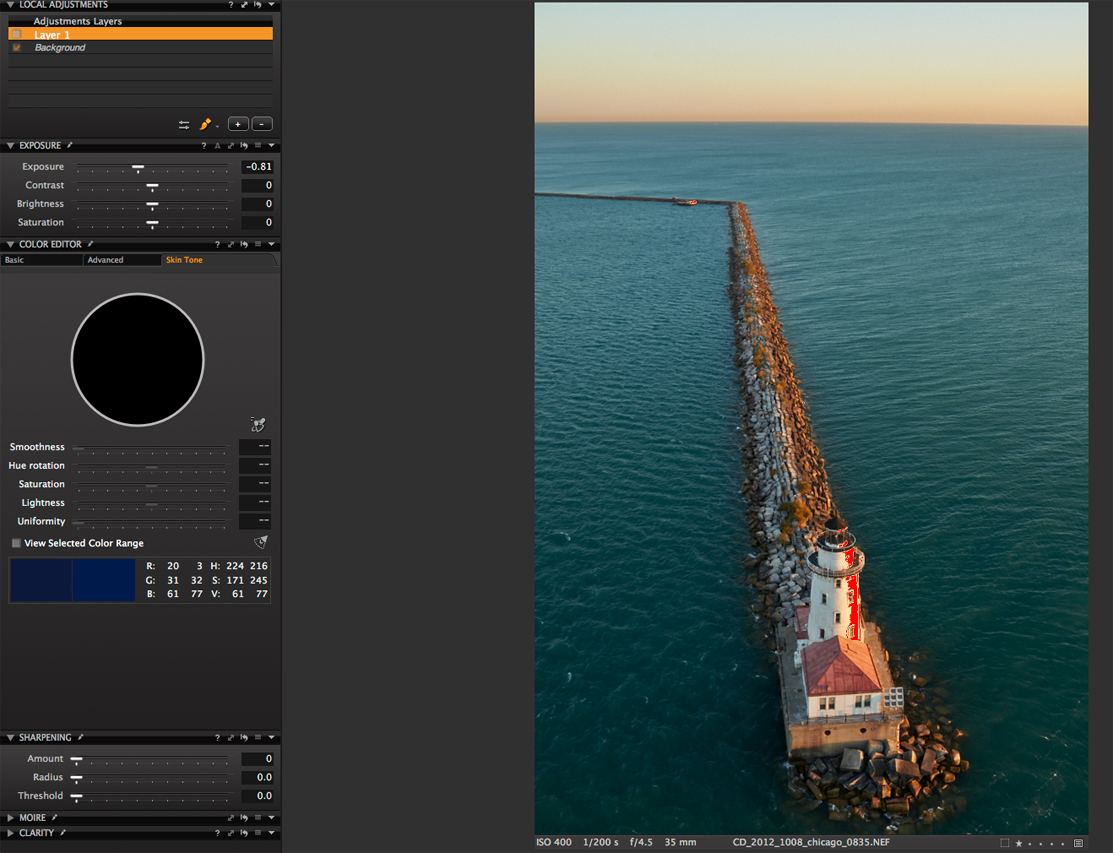
I thought about Steve Hendrix’s Skin Tone editor suggestion and used the editor to shift the water color toward blue.
For those wondering why I use the Skin Tone Editor to shift color instead of the Advanced Color editor – it is just another arrow in the quiver. You can shift the color a fair amount and the uniformity slider allows you to spread or restrict the color. I find it useful for coloring grass or shifting the color tone in water.”
After taking a sample of the green water, I shifted the color quite a bit plus increased the smoothness and uniformity. The water was a bit dark to my taste and I increased the lightness to 2.2. This is a great trick for decreasing or increasing brightness in an area. I often use it to bring down skies and to increase the color.
 Next up was the sky. It seems as if it is almost a must-do wtih aerials that if you expose for the surface than your sky tends toward overexposure. I prefer to not use gradient filters while shooting aerials. They can be one more item that can drop out of the helicopter and my philosphy is, safety first. I take a minimalist approach while in the helicopter becuase more weight equals less power and the less equipment in the rear cabin the less chance something can go missing.
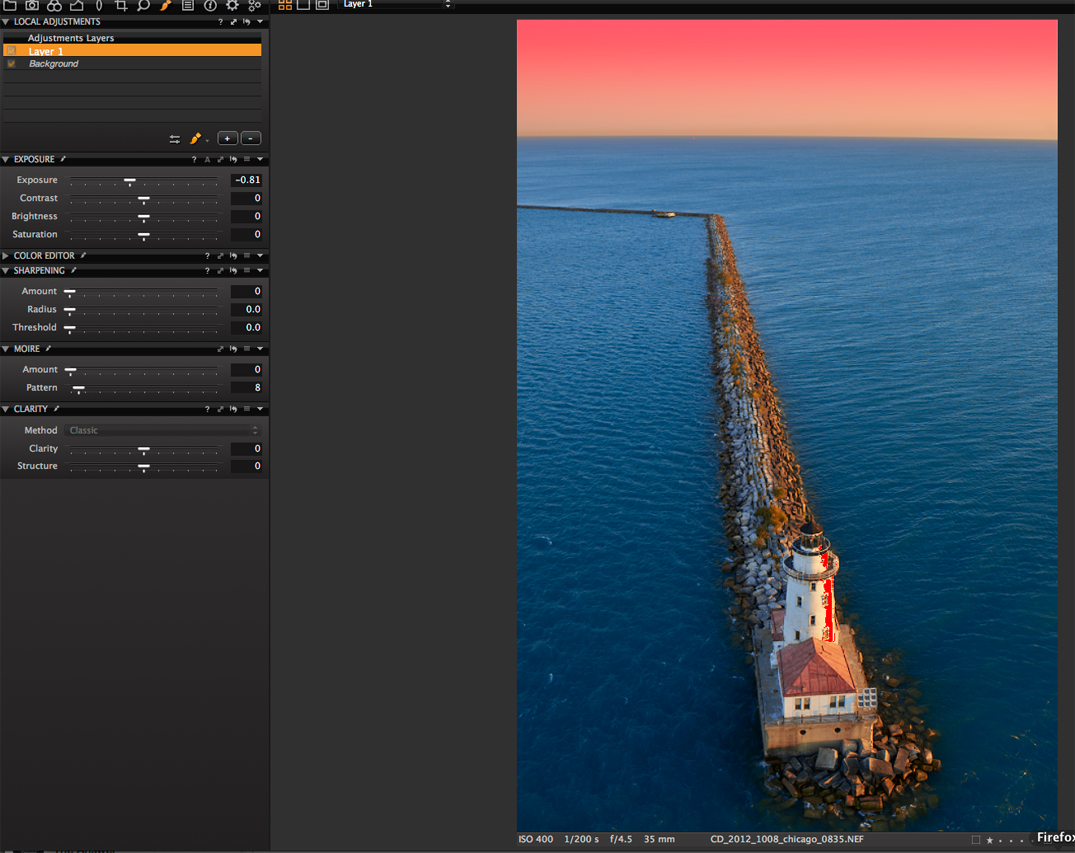 The sky correction was made on a second level and was close to 3/4’s of a stop.
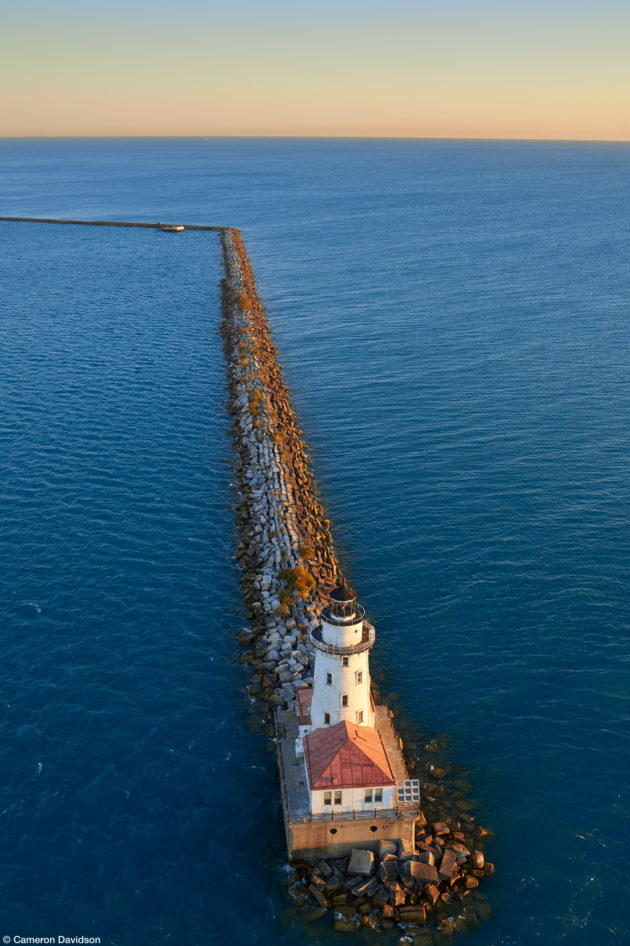
Since this image was intended for stock, I wanted the colors to pop a bit when seen as a thumbnail on the agency website. I find for many of my aerial and landscape images that I can process the image out to a final delivery file without going into secondary image editing programs to correct or enhance.
Cameron Davidson
email: [email protected]
web: http://www.camerondavidson.com
Cameron Davidson
Cameron Davidson is a well known American aerial and location photographer who shoots for a healthy mix of editorial, NGO and commercial clients including Vanity Fair, Dominion Resources, Virginia Tourism, Money and ESPN The Magazine.


I want a White Balance Brush Tool!!
Sorry Cameron but the water is not the green you remembered but more green… Chicago has the greenest water around. I am not a purist but why would you misrepresent the water as blue when it really isn’t… I dig the whole matter of tastes issue… but if your the type of destination photographers then don’t you think the people who view Chicago waters should know that the color of the water is in fact the green color and not a blue? i am not ranting or raving or a purist… I manipulate images… I am just curious as to why he even had to change it… Just a curious Chicagoan wants to know.
The purpose of any of these blog entries is to teach a few new techniques.
I do not remember the water being a dark green. I was using a polarizer and it took away a lot of the sky reflection – which was blue – so the water – was as I remembered – much bluer than green.
So, to answer your question – there was no misrepresentation. The color editor allows me to push the saturation if I wanted and I did. A stock image needs to read quickly. Yes, the water may be green when you see it ground level. From above, it also reflects the sky, which that morning was a bright blue.
I completely agree with Joe. You misrepresented the scene. I appreciate the new technique, but not the example. Joe was not asking the question of whether you misrepresented the scene, but WHY you did it, which you clearly did. The natural colour of the water is green, not blue. Maybe you should have increased the saturation to make it more green, and not change its colour to one that it isn’t.
David –
You were not in the helicopter with me.
I shot the image. I recall the what I saw and I remember how much blue sky reflection the polarizing filter removed from the water.
I did not misrepresent anything. I processed the file to how I
remembered the scene. This is not a photojournalism shot – it was shot for a personal project and it is my prerogative as the photographer to change, interpret or embellish color as I see fit. Sensors do not always record color correctly and profiles in software can shift a color with bias – that is why there are choices in the profile you use.
The idea behind this blog series is to show different techniques using Capture One. This is an unusual technique that may be of help to a photographer in the future – maybe even you.
Rather than concentrating on what you consider a misrepresentation – you may want to think about how this technique can help you with your own photography – maybe in correcting a color cast that crept into your frame.
Thanks for your note. I can assure you – the water was bluer than you think.
Another thought on the green water comments. I did not show the color temperature – white balance for this shot. The shot was originally cooler and I warmed it up quite a bit. The additional warming added yellow to the images and would push the blue of the water toward green – which is what you see in the Capture One screen shot.
This is not a technique for every day use – but it is helpful when a color did not record “correctly” or a client demands a certain color tone or even when you just feel it is right for the shot. I use it – sparingly – and share it to help other photographers who may need to make a shift in color.
Thanks for your example Cameron! Could you please explain in detail how do you shift the color of the water? You didn’t move “hue rotation slider”. Is it done by “uniformity”?
Gregory
In the color editor wheel – you take the little black circle and move it to get the color shift. You take a sample to get the range. Increase the uniformity and you will see the black circle. Move the black circle to you start getting the color you want.
I pushed the smoothness and uniformity all the way to the right and increased the saturation.
Hello Cameron,
unfortunately I can not confirm the change of e.g. water color using the “skin color correction tool” on a level layer.
I tried a lot!
There are minimal color changes when pushing the Hue rotation tool.
Furthermore when the “view selected color range register” is activated not only the layer color ist shown but the same background layer colors also.
Please, can you tell something about the tips you got from from Steve Hendrix ?
I use: CaptureOne 7 .2.3 Build 29
MacPro 10 core 40GB RAM
King regards
Wolf
Hello Cameron,
there are some news:
developing *.cr2 RAW files from Canon EOS 5D:
only minimal effects using the “skin color correction tool”;
developing *.cr2 RAW files from Canon 1Ds Mark III
significant more effects using the tool.
Hope there is an explanantion for this reaction of CaptureOne in developing Canon RAW files.
Thank you very much for your reply
Wolf
HI Wolf –
I don’t shoot Canon so I have no idea why there is a difference in how C1 and the color editor work with Canon RAW files.
I shoot mostly with a Leaf Credo 60 digital back or a Nikon D800/D810.D4 combo.
Best suggestion is to open up a case with Phase in the support forum. Someone may be able to help you with this.
http://forum.phaseone.com/En/
Best of luck to you.
Just watching a few of your Guest appearances here and wanted to thank you for the effort and information provided.
You could have changed the water to orange if you’d wanted as I take the lesson, not the end result.
It would be even more useful if a hi-res file, of any old image, could be made available to walk through the instructions with you. Hands on is much preferred.
Cheers
S2