NOTE: This article discusses an older version of Capture One Pro. To learn more about our latest version, click here.
As a nature photographer, I spend a great deal of time trying to get to the most remote places possible. Like all photographers in the nature space, my goal is to create unique images – helped along by my sailing background and the fact that I seem to be frequently working on a boat.
That being the case, there are some inherent challenges in nature photography, whether it be limitations on gear, split second opportunities to take a photo, or terrible lighting. Because of that, photo editing software and a good understanding of how to use it are quite possibly the most important tools in my photography toolkit.
It also requires an immense amount of patience and luck. Having a good camera is important in nature photography, but not as critical as luck, timing, and editing.
I spent several years working in Lightroom. I don’t have anything bad to say about it, because it’s a great tool. But, as I have been working for over a decade as a photographer and moving more into the world of selling prints, I felt like I wasn’t getting enough out of my images in Lightroom. Was I nervous about switching out of my comfort zone to learn a new editing software? Yes. Did it take a long time to get comfortable with Capture One? Not one bit. It is an incredibly intuitive photo editor.
After switching my Lightroom Presets over to color-adjusted Styles in Capture One, I had a solid editing foundation in place. My editing workflow is pretty simple after that: I typically just make minor adjustments in the dynamic range and bump up the clarity ever so slightly.
But the difference in the way those adjustments in Capture One compare to Lightroom are noticeably visible. It’s much more controlled. It’s fine-tuning instead of broad strokes. And the finer details make a huge difference to nature photography for me.
What was my biggest hold up for making the switch from Lightroom to Capture One? It sounds silly, but it was the dehaze option. Shooting in the water, or in conditions with hazy atmospheres, it was a wonderful tool to have in Lightroom. It’s also readily available in Capture One due to the ease of creating a filled layer, increasing the contrast, and decreasing the brightness. Now I have even more control over that adjustment and ultimately better results.
For the amount of time and energy I put into capturing one image (often times months), it’s comforting to know that I can get the most out of it through my photo editing software. Combine that with how much faster Capture One is, I can now spend more of my time waiting for “the moment” and out shooting photos instead of waiting for editing adjustments to catch up.
It’s well worth the switch.
Dave Mullen
A military veteran, Davy transitioned from a narrow view of the world through a rifle scope to sharing a more positive view of the natural world through a camera lens. He’s worked as a commercial photographer with international brands, sailed with National Geographic, and co-founded an adventure cruise company.
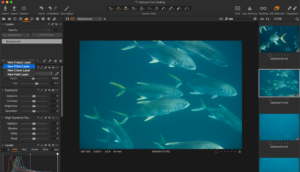
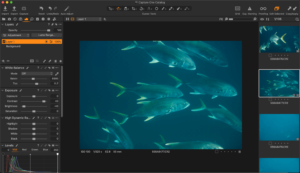




While I never drank the Adobe CC kool-aid, I started using Lr with ver. 1 Beta and never looked back. Until Lr 6.14, and it wasn’t giving me what I wanted with my A7RIII files. That’s not a dig; time and software move on.
I made the jump to C1 Pro for Sony and now use 20.0.3. There are some things Lr does better, especially DAM (and their auto mask is infinitely better) but C1 does some things better and some things differently (layers, and building a mask from a colour selection for example). I love how customizable C1 is. David Grover’s webinars on learning C1 have been tremendously valuable to me.
Depending on who’s reading this, you may or may not know the difference between a preset (one slider) and a style (multiple sliders) in C1. C1 won’t accept Lr’s processing edits (different engines) but there is a 3rd party company that offers a Lr to C1 preset converter. I don’t have much experience with it as I don’t often use Styles but for those who are interested you can find it here: https://www.picture-instruments.com/products/index.php?id=17
Mike.
Thanks for the dehaze tip. I had been reopening everything into photoshop raw.
Best regards,
John
Hello Dave,
I’ve switched from Aperture to Capture One . Regarding the intuitiveness of this program, I think there is room for improvement. But the quality of COP is excellent.
I have a sinister question about backing up my library. I’ve got my library on several external hard disks. When I want to refresh this back up, I drag the library to the connected hard disk. But what is does then, is that it not only “export” everything that is changed, but it backs-up the whole library. In Aperture only the changes were back-upped. So, everytime it takes a hour to complete this task. Is that how the programs works, or is there another way? I ‘ll like to keep my external hard disks as backup !!
Thank you for your help.
Kind regards,
Jan
as a devotee of L’room dehaze, this was very helpful and reassuring. Thank you!
I note the comment:
“—- it was the dehaze option. Shooting in the water, or in conditions with hazy atmospheres, it was a wonderful tool to have in Lightroom. It’s also readily available in Capture One due to the ease of creating a filled layer, increasing the contrast, and decreasing the brightness. Now I have even more control over that adjustment and ultimately better results”
So do I take it that Capture One doesn’t actually have dedicated ‘dehaze’ option, & that the writer uses, ‘creating a filled layer, increased contrast etc’ achieve the result?
If correct, any chance Capture One will provide a ‘dedicated’ dehaze option.
Thank You
No, it has the clarity and structure sliders that replace dehaze.
muy hermosas las fotos.Que linda es la nuturaleza
Saludos